KL Cherokee Lift Back Story
Over the years I have owned a few Jeeps. I started off with a Wagoneer Limited XJ, an '88 I believe. Followed that with a 1998 Wrangler Sahara TJ. From there a 1998 Grand Cherokee Limited ZJ which I still have today. A few years ago I purchased a Craigslist 1999 Cherokee Sport XJ with lots of miles and used it as a daily commuter and hobby vehicle. The "hobby" part was taking a lot of time from my weekends, but I loved it. The time finally came, however, to transfer the hobby to another Jeep lover after driving it to 235,000 miles.
 In a moment of insanity, or possibly of clarity, I purchased a lightly used 2016 Jeep Cherokee Latitude 4x4. I was instantly plunged into the future with an unfamiliar design and layout, but I have been liking the vehicle very much. Despite liking it very much, I certainly would waste no time in "Jeeping it up".
Video available for this project
Lifting
The first order of business - lift it. The lifts available are slight at this time, and may always be, but any lift is a good lift. I bought the Hazard Sky lift - AD1 (Active Drive 1) version, and went straight to work.
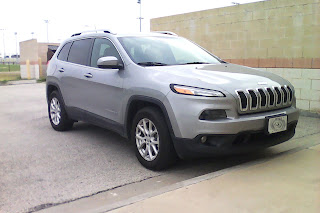
Here is the Jeep in raw form with stock suspension and tires:
The lift kit is cheap and great on the budget. I would need a few extra items in order to to get the job done, however, but they were things that any good tool set should have anyway.
The job requires a drill bit, a 12mm drill bit specifically. I read online that people get by with a 7/16" drill bit, which is more common, so that is what I bought. "Getting by" means a bit of hassle in this case. Especially when doing this job under the 90 degree sun. I believe that a 12mm bit would have made life much easier, but it would have had to be ordered or hunted for. I got excited and used the workaround. I also purchased a 19mm socket that I wasn't sure I had, and an additional 18mm socket. I had MacPherson Strut Spring Compressors from a previous lift performed on my XJ. Also, the job requires an E14 socket for the star bolt. This was critical I believe, I didn't want to risk stripping things out or general frustration by using workarounds on the star bolt.
OH! One more thing! If you are lame like me, you may discover that neither one of your drills are capable of accepting a 7/16" or 12mm drill bit. Don't find this out when you are deep into the project. My neighbor saved the day in this regard and loaned me his 1/2" drill.
Initial Measurements
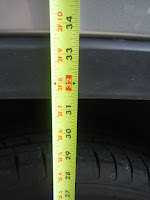
The stock vehicle sat on 225/65r17 tires. This is a 28.5" tire. I measured from the ground in the middle of the tire, up to the rim of the fender. Front measured approximately 30 5/8". Rear measured approximately 31.5". Finally, there is a tight bit of space in the rear wheel hub, well over an inch for most, but this has to be contended with and considered when choosing tires for our AD1 vehicles.
The work
I was a numnuts. I didn't do this job in the winter, spring or fall, I did it in summer in a 9A growing zone with no shade. By the way, whatever the internet home mechanic pros estimate as far as time to complete these jobs, I double or triple that. Never have I had a job that takes "30 minutes", take 30 minutes. You all are simply better than me, or lying. Either scenario is likely.
Speaking only for myself, just about every job like this that I take on has unforeseen challenges and frustrations, be it a stubborn bolt, a trip to the hardware store, or something that simply won't happen as expected. I curse and moan and feel sorry for myself until I figure it out and complete the project, then I return in a couple of weeks to put myself through something else.
I started with the rear, as I suspected this to be the more involved portion. I loosened lug nuts, jacked up the vehicle at our well-designated rear jacking point and lifted. I would need the jack for part of the install, so replaced it with jack-stands.
I utilized a combination of reducing the coil spring tension using MacPherson Strut Spring Compressors with detaching the lower control arm and sway bar link to get the spring out. I felt safer doing it this way rather than solely compressing the springs until they can be removed. It seemed like a nice compromise safety-wise, and I was taking my time anyway.
There are two 3/8" spacers utilized for the AD1 rear lift. These were installed easily and end up looking as they do in this photo:
Putting everything back together required a combination of maneuvering the lower control arm with the jack and aligning the bolt holes to reinstall the control arm and sway bar link bolts. Plenty of frustrating and perplexing moments in between that I am leaving out, but all doable with patience. Most frustrations were brought on by working in the 90-degree heat. Boo friggin' hoo.
The front lift was a tad less involved. Difference here was both front wheels were jacked up at the same time to avoid some twisting that would make bolt hole alignment more difficult. I still experienced some of this, but can only imagine that it would have been worse had I worked with one wheel jacked up at a time.
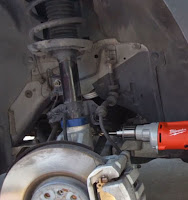
I removed the front wheels to proceed. Then the bolt supporting the strut was removed using two sockets, the 18mm and the E14.
I also removed the brake line and gave slack to the speed line on the left. This allows the knuckle to be lowered and aligned with an existing hole further down.
With the bolt removed and more slack ensured, I lowered the knuckle easily with a few taps of a wooden block and aligned it with the second, unused hole.
A spacer was provided with my kit to aid in lowering and tapping to the correct distance.
The existing hole had to be drilled out and enlarged in order to accept the NEW bolt and nut. Using the old bolt and nut is not recommended as they are intended for one time use only, to be replaced when removed.
The passenger side took a while as I was being careful with the drilling process. Again, I think the 12mm bit would have made things easier to widen this passage. I then had problems with aligning the hole just right to allow the new bolt to come out the other side. Many curse words were let out until I made it work! With the bolt through, I torqued it down to 90 ft. lbs.
The speed cable and brake line were then secured to their proper positions, allowing slack for movement.
The driver side went much smoother. I guess I had earned that.
Once everything was put back in place and the wheels put back on, the vehicle was lowered. Wow, what a difference! But not so fast, the rear springs would settle, as is normal. I waited at least a day after driving to take final measurements.
Post lift measurements with still stock tires:
Front measurement: Approximately 31.5"
Rear measurement: Approximately 32.25"
The gap between the tire and the front of the rear wheel hub was around the same, but I believe that it actually widened a bit. No photos taken for this.
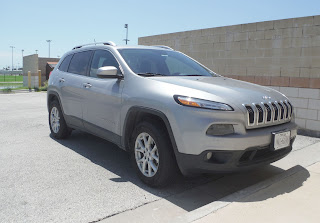
Now for the post lift photo.
A huge difference? Coming from the world of XJ's and Wranglers and doing 2 and 4 inch lifts, not really. The main benefit will be in allowing an additional inch of lift with larger tires. This makes it all worth it to me. Now it is ready for the installation of 245/70r17 All Terrain tires. These are 30.5" tires.
This would require an additional modification
which will be covered in the next posting!
Hey folks. Did you find value in this information? Maybe even $2.50 or $2.99 worth of information? Then consider buying a Kindle, Android or iPhone version of one of my books, which have nothing do do with Jeeps at all. Do give them a positive review if you end up doing so.


No comments:
Post a Comment